This article outlines the steps to follow for installing the Sync 7 launcher to your PC for the first time as well as setting up your Sync connection.
If you already have the launcher installed skip Part 1 and go straight to Part 2. Note that Part 3 is only required if you don't already have Crystal Report Viewer installed.
TABLE OF CONTENTS
- Part 1: Download & Install Sync 7 Launcher
- Part 2: Add your company-specific connection details and then log in:
- Part 3: Install Crystal report viewer:
Part 1: Download & Install Sync 7 Launcher
| 1 | Download the iSync Launcher by clicking on this link: https://setup.sync7.net/clickonce/iSync.Launcher.application | |
| 2 | Once downloaded, double click on the file to install. A) If you get a windows warning, then click on ‘More Info’ B) Then click on 'Run Anyway' | A: Windows Warning B: Additional Info  |
| 3 | When installation is complete, a Login window will appear. You can now proceed to Part 2: Add Connection Details |  |
Part 2: Add your company-specific connection details and then log in:
| 1 | In the Login screen click on the Pencil icon: |  |
| 2 | Click on the ‘+’ icon to add the new connection: |  |
| 3 | Enter the details and click 'OK':
|  |
| 4 | Click the ‘Arrow’ icon to go back to the login screen: |  |
| 5 | Select the new connection from the connection dropdown, enter username and password and click login: |  |
Part 3: Install Crystal report viewer:
If you don't already have Crystal Report Viewer installed, please follow the instructions below to download:
| 1 | Download the following link: http://isyncsa.com/support/Installs/crystal/CRRuntime_32bit_13_0_9.msi | |
| 2 | Once downloaded, right click the file and select 'Run as Administrator' A) If you get a windows warning, then click on ‘More Info’ B) Then click on 'Run Anyway' | A: Windows Warning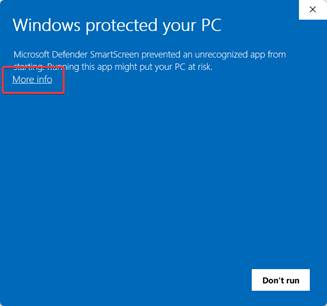 B: Additional Info B: Additional Info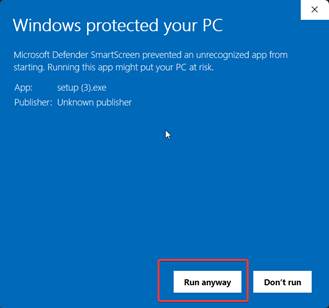 |